Picture this: It’s Monday morning, and your best customer calls needing an excavator for an emergency job. You’ve got one available—or so you thought. Your operator discovers a cracked hydraulic line during startup, turning a $2,000 daily excavator rental into a $2,000 repair bill and a lost customer.
This scenario plays out daily across equipment rental yards nationwide. But it doesn’t have to.
Whether you’re renting out excavators, bulldozers, or compact loaders, a comprehensive inspection process transforms costly surprises into predictable maintenance. By the end of this article, you’ll have a complete system to protect your equipment, keep customers safe, and build a more profitable rental operation.
Table of Contents
- Free Heavy Equipment Inspection Checklist PDF
- Why You Need a Standardized Heavy Equipment Inspection Form
- What Should a Heavy Equipment Inspection Checklist Include?
- Preventive Maintenance Schedule & Timelines
- Implementing a Heavy Duty Equipment Inspection Process
- Making Heavy Duty Equipment Rental Management & Inspections Easy
- Using the Right Tools and Partners
Free Heavy Equipment Inspection Checklist PDF
Think about your top mechanic—the one who never misses a thing. Even they can’t remember every inspection point across different equipment types. That’s where a standardized checklist becomes invaluable.
Our comprehensive heavy equipment inspection checklist eliminates guesswork and ensures consistency across your entire team. It’s the difference between hoping nothing gets missed and knowing your equipment is rental-ready.
Download Quipli’s Heavy Equipment Checklist PDF
Free Heavy Equipment Inspection Tool – Mobile Inspection Lite
Digital inspection forms streamline your operation in ways paper never could. Your techs complete inspections on tablets or phones, automatically syncing data to your main system. No more lost paperwork or illegible handwriting.
Digital vs. Paper: Why Both Matter
Don’t abandon paper entirely. Print laminated copies for equipment cabs, giving operators quick reference during pre-shift checks. Hand copies to customers at pickup, demonstrating your commitment to safety. This dual approach covers all bases while modernizing your core process.
Why You Need a Standardized Heavy Equipment Inspection Form
Let’s be honest—nobody enjoys paperwork. But standardized inspections aren’t about creating more forms to fill out. They’re about protecting everything you’ve built.
Consider what’s at stake. Your reputation, built over years of reliable service. Your assets, worth hundreds of thousands per unit. Your customers’ safety and project success. A missed inspection point can jeopardize all of it in minutes.
Prevent Accidents from Occurring
The statistics are sobering. According to the Bureau of Labor Statistics, a worker died every 99 minutes from a work-related injury in 2023
But here’s what those numbers don’t show: the accidents prevented by diligent equipment owners like you. Every properly completed inspection is a potential tragedy avoided.
Imagine a customer’s operator not going home because your equipment failed. The lawsuit alone could bankrupt a small rental operation. More importantly, you’d carry that weight forever. Comprehensive inspections aren’t just good business—they’re moral imperatives.
Preventing Accidents in Equipment Rental | Rental Roundtable
Reduce Overall Maintenance and Repair Costs
Here’s a scenario every rental owner knows: A customer returns a skid steer saying it “sounds funny.” Without inspection records, you’re flying blind. Was that bearing noise present before rental? When was the hydraulic fluid last changed?
Proper inspections create accountability and cost savings:
- Early detection saves thousands: Catching a $50 hydraulic leak prevents a $5,000 pump replacement
- Warranty protection: Documented maintenance history preserves manufacturer warranties
- Accurate damage billing: Pre-rental inspections prove existing conditions, ensuring customers pay for damage they cause
- Predictable budgeting: Regular inspections reveal replacement timing, letting you budget rather than react
Consider this real example: A rental company spent $15,000 replacing an excavator’s final drive. Post-mortem analysis showed metal shavings in the oil—visible during inspections months earlier. A $500 preventive repair became a $15,000 emergency.
Maintain Consistent Fleet Utilization
Equipment generates revenue only when it’s rented. Every breakdown creates cascading problems:
- Lost rental income ($500-2,000 per day for most heavy equipment)
- Emergency repair premiums (typically 50% higher than scheduled maintenance)
- Customer dissatisfaction and potential loss
- Reputation damage in a word-of-mouth industry
Regular inspections keep your iron earning. When a contractor needs equipment, you confidently say “yes” knowing your machines won’t let them down. This reliability becomes your competitive advantage against larger rental houses.
What Should a Heavy Equipment Inspection Checklist Include?
A thorough inspection covers three critical phases, each revealing different potential issues. Think of it like a doctor’s checkup—some problems only appear under specific conditions.
Your inspection process should adapt to equipment types while maintaining core consistency. An excavator needs track tension checks; a telehandler requires boom inspection. But both need hydraulic system evaluations and safety device verifications.
Pre-Start Inspection
The pre-start inspection is your most detailed check, performed with the engine off. Budget 15-20 minutes for experienced operators, 30 minutes for newer team members.
This phase catches 80% of potential issues before they become field failures. It’s also when you document existing conditions, protecting against unfair damage claims.
Safety and Documentation Checks
Start with the basics that keep operators safe and your business protected:
- Operator’s manual: Verify presence and legibility (replace if oil-soaked or torn)
- Safety decals: Ensure warning labels are intact—OSHA fines for missing decals start at $1,000
- Fire extinguisher: Check mounting, seal integrity, and expiration date
- Emergency stops: Test all e-stop buttons—they should click audibly and require reset
- Inspection records: Review last three inspections for recurring issues
Real-world tip: Keep a “safety kit” with replacement decals, zip-ties for manuals, and spare extinguishers. Minor fixes during inspection prevent rental delays.
Hazard Assessment
Train operators to think beyond the machine:
- 360-degree walk: Circle equipment checking for obstacles, soft ground, or overhead hazards
- Ground conditions: Probe suspicious areas with a rod—hidden holes cause 30% of tip-overs
- Overhead clearance: Note power lines, bridges, or tree limbs—mark heights on rental contracts
- Slope assessment: Identify grades exceeding equipment specifications
One rental company avoided disaster when inspection revealed a customer planned excavation near unmarked utilities. The extra five minutes prevented a potential gas line strike.
Cab and Operator Station
The cab inspection ensures operator comfort and safety—critical for 8-hour workdays:
- Seat functionality:
- Adjustment mechanisms work smoothly
- Suspension isn’t bottomed out
- No tears exposing cushioning (moisture entry point)
- Seat belt system:
- Insert buckle and listen for positive click
- Pull hard to verify latch holds
- Check webbing for cuts or fraying
- Retractor springs back properly
- Visibility elements:
- Glass surfaces clean and crack-free
- Mirrors properly adjusted and secure
- Sun visor functional
- Windshield washer reservoir full
- Control inspection:
- All levers move smoothly without binding
- Pattern decals clearly visible
- Lock-out functions engage properly
- No excessive play in joysticks
Engine and Fluids
Fluid checks prevent the majority of catastrophic failures. Make these non-negotiable:
Engine oil:
- Check with machine level and engine cold
- Oil should be between min/max marks
- Look for metallic shimmer (bearing wear)
- Note unusual odors (fuel contamination)
Hydraulic fluid:
- Usually checked with attachments lowered
- Watch for foaming (air entrainment)
- Color should match manufacturer specs
- Temperature should be hand-warm after operation
Coolant system:
- Never open when hot—pressure can cause severe burns
- Check concentration with refractometer (prevents freezing/boiling)
- Look for oil contamination (head gasket failure sign)
- Verify overflow bottle level
Other critical fluids:
- DEF/AdBlue for Tier 4 engines (crystallization blocks injectors)
- Transmission fluid (color indicates condition)
- Differential oil (often forgotten until failure)
- Fuel quality (water contamination common after storage)
Cost consideration: Fluid analysis costs $25-50 per sample but can predict failures months early. Consider quarterly analysis for high-hour machines.
Undercarriage and Ground Engagement
Undercarriage represents 50% of tracked machine ownership cost. Careful inspection maximizes this investment:
For tracked equipment:
- Track tension (2-4 inches sag typical—check manual)
- Sprocket teeth (sharp edges indicate replacement need)
- Track pad condition (missing pads create vibration)
- Idler wheels (free movement prevents premature wear)
- Rock guards (damage allows material packing)
For wheeled equipment:
- Tire pressure (10% low = 15% life reduction)
- Tread depth (measure three spots per tire)
- Sidewall condition (weather checking indicates age)
- Wheel nut torque (check with torque wrench monthly)
- Hub oil levels (often ignored until bearing failure)
Money-saving tip: Track wear patterns reveal operation issues. Inside wear suggests tight turns on pavement; implement operator training to extend track life 20%.
Hydraulic System Deep Dive
Hydraulic failures cause 40% of equipment downtime. Systematic inspection prevents most issues:
Hose inspection:
- Run hands along hoses feeling for soft spots
- Check fittings for seepage (not all leaks drip)
- Look for rubbing against frame or other hoses
- Verify protective sleeves in high-wear areas
Cylinder examination:
- Chrome rods should be mirror-smooth
- Wiper seals must be intact (dirt entry destroys cylinders)
- Check mounting pins for wear
- Operate through full range checking for drift
System cleanliness:
- Breather caps clean and functional
- No debris around tank opening
- Fill cap seal intact
- Sample ports capped when not used
Attachments and Implements
Attachment condition directly impacts productivity and safety:
Cutting edges and teeth:
- Measure wear against manufacturer limits
- Check tooth shank condition
- Verify retaining pins/locks present
- Note scalloping patterns (indicates needed rotation)
Quick coupler systems:
- Manual locks must click positively
- Hydraulic couplers need visual indicator check
- Safety pins must be attached and straight
- Warning labels must be legible
Hydraulic connections:
- Quick-disconnects should connect without forcing
- Check O-rings for cuts or missing sections
- Verify dust caps are present and used
- Test auxiliary hydraulic flow if applicable
Warm-Up Inspection
After 5-10 minutes of operation, perform these checks with engine running. This phase reveals issues that only appear under load or temperature.
System Performance Checks
Monitor these indicators during warm-up:
Engine behavior:
- Smooth idle without hunting
- No unusual knocks or rattles
- Exhaust color (black = fuel, white = coolant, blue = oil)
- Temperature rises steadily to operating range
Hydraulic response:
- Functions activate smoothly without jerking
- Normal cycle times (bucket curl in 3-4 seconds typical)
- No unusual whining or cavitation sounds
- Relief valve doesn’t constantly activate
Instrumentation verification:
- All gauges reading normally
- Warning lights extinguish after start
- Hour meter advancing
- Any diagnostic codes displayed
Operational Safety Systems
Test these critical systems under power:
Brake systems:
- Service brakes stop smoothly without pulling
- Parking brake holds on specified grade (usually 15%)
- No excessive pedal travel
- No air leaks (pneumatic systems)
Warning devices:
- Backup alarm clearly audible (97-112 dB at 4 feet)
- Rotating beacons functional
- Work lights aim correctly and illuminate adequately
- Horn sounds clearly
Operator presence systems:
- Seat switch prevents operation when unoccupied
- Armrest or gate switches function
- Neutral start safety operates
- Hydraulic lockouts engage properly
Shutdown Inspection
Proper shutdown prevents many next-start problems:
Operational Shutdown Procedure
Cool-down prevents thermal shock and extends component life:
- Idle protocol: Run at low idle 3-5 minutes (turbocharged engines: 5 minutes minimum)
- Attachment positioning: Lower all implements to ground (prevents cylinder drift)
- Pressure relief: Cycle all functions to neutral, relieving trapped pressure
- System monitoring: Ensure temperature drops before shutdown
Securing for Next Use
These steps prevent damage and ensure ready availability:
Fuel management:
- Fill tank to 95% (prevents condensation)
- Add fuel stabilizer if storing over 30 days
- Lock fuel cap (diesel theft is increasing)
Environmental protection:
- Install intake caps (prevents rodent nesting)
- Cover exhaust stack (moisture causes rust)
- Close windows and lock doors
- Remove any trash or tools
Positioning:
- Park on level, stable ground
- Face exit direction if possible
- Leave space for inspection access
- Set wheel chocks if required
Preventive Maintenance Schedule & Timelines
Think of preventive maintenance like changing your truck’s oil—skip it to save $100 today, spend $10,000 on engine replacement tomorrow. Heavy equipment follows the same principle but with higher stakes.
Different manufacturers specify varying intervals, but this framework applies broadly. Always check your manual for model-specific requirements.
Daily Checks (Every 10 Operating Hours)
Daily inspections catch problems before customers do:
- Complete full inspection checklist
- Grease all specified points (typically 5-15 locations)
- Check and clean air filter indicator
- Verify fluid levels
- Remove debris from radiator and compartments
- Document any issues discovered
Time investment: 20 minutes saves average $400 in prevented failures
Weekly Service (Every 50 Hours)
Weekly tasks prevent wear accumulation:
- Detailed undercarriage inspection with measurements
- Battery maintenance:
- Clean terminals with baking soda solution
- Check specific gravity if serviceable
- Tighten connections to spec
- Apply protective coating
- Torque wheel nuts to specification
- Inspect cutting edges, measure wear
- Function test all safety systems
- Check belts and hoses thoroughly
Budget consideration: Weekly PM costs $150-200 in labor but prevents $2,000-5,000 monthly repair average
Monthly Maintenance (Every 250 Hours)
Monthly service addresses wear items:
Engine service:
- Oil and filter change ($150-300 depending on capacity)
- Fuel filter replacement ($50-150)
- Air filter service ($75-200 for heavy-duty systems)
System checks:
- Belt tension adjustment
- Coolant protection test
- Hydraulic filter replacement (some models)
- Transmission service (varies by type)
Inspection points:
- Exhaust system integrity
- Emissions equipment function
- Electrical connection tightness
Parts tip: Buy filters in bulk for 30% savings—store properly to prevent contamination
Quarterly Service (Every 500 Hours)
Quarterly maintenance digs deeper:
Comprehensive hydraulic service:
- Filter changes ($200-400)
- Fluid sampling ($50)
- Pressure testing if indicated
Cooling system service:
- Pressure test
- Thermostat operation
- Fan belt/bearing condition
Major inspections:
- Attachment wear measurement
- Structural crack detection
- Electrical system load test
Semi-Annual Service (Every 1,000 Hours)
Major service intervals prevent catastrophic failures:
Powertrain service:
- Transmission fluid/filter
- Differential oil change
- Transfer case service
System overhauls:
- Coolant flush and fill ($300-500)
- Complete brake inspection
- Air conditioning service
Component checks:
- Turbocharger inspection
- Injector service (diesels)
- Valve adjustment if required
Annual Service (Every 2,000 Hours)
Annual service is your equipment physical exam:
- Complete machine inspection by certified technician
- Major component evaluation:
- Pump flow testing
- Cylinder rebuild assessment
- Undercarriage replacement planning
- Updates and calibrations:
- ECM software updates
- Emissions system service
- Safety system calibration
Financial planning: Budget 2-3% of equipment value annually for maintenance
Environmental Adjustments
Operating conditions dramatically affect service intervals:
- Severe dust: Halve air filter intervals, increase greasing frequency
- High moisture: Add corrosion inspection, increase greasing
- Temperature extremes: Adjust fluid types, increase battery maintenance
- Continuous operation: Reduce all intervals by 25%
Recommended Resource: How to Track Your Rental Inventory with Excel or Google Sheets (With Free Spreadsheet Template)
Implementing a Heavy Duty Equipment Inspection Process
Creating a checklist is easy. Getting your team to use it consistently? That’s where most rental operations struggle. Here’s how to build an inspection culture that actually sticks.
Step 1: Establish Clear Ownership
Ambiguity kills accountability. Define exactly who does what:
Operators’ responsibilities:
These include a 15-20 minute pre-start inspection, a 5-minute post-operation check, immediate issue reporting, and basic fluid top-offs. These tasks form the foundation of your preventive maintenance program because operators interact with equipment most frequently and can spot developing issues before they become failures.
Mechanics’ duties:
Your mechanics carry different responsibilities focused on deeper analysis and systematic maintenance. They handle weekly detailed inspections, execute scheduled PM tasks, audit inspection quality to ensure operators are following procedures correctly, and train operators on proper checking techniques.
Management oversight:
This includes monthly audit reviews, process improvement initiatives, resource allocation decisions, and performance tracking. When leadership actively engages with inspection data, it signals to the entire team that this work matters.
Success story: One rental company reduced breakdowns 40% by simply posting inspection assignments on a whiteboard. Visibility created accountability.
Step 2: Create Foolproof SOPs
Standard Operating Procedures remove guesswork:
Document these essentials:
- When each inspection type occurs
- Required time allocations
- Pass/fail criteria for each item
- Escalation procedures for issues
- Record storage requirements
These details eliminate the confusion that leads to skipped steps or inconsistent execution.
Make SOPs practical:
- Use photos showing good vs. bad conditions
- Create equipment-specific versions
- Laminate for field use
- Update quarterly based on findings
When your SOPs are clear and accessible, you’ll eliminate the “I didn’t know” excuse and create consistency across your entire fleet.
Step 3: Embrace Digital Tools
Paper forms end up in puddles or trash bins. Digital tools transform compliance:
Essential features:
Look for systems with mobile-friendly interfaces that your team can use on phones or tablets. Photo attachment capability documents conditions visually. Automatic report generation eliminates manual data entry, and integration with maintenance systems connects inspection findings directly to work orders.
Implementation tips:
Start your implementation with willing early adopters who can champion the system. Provide tablets in protective cases that survive job site conditions. Create separate logins for accountability so you know exactly who completed each inspection, and celebrate successful adoption to build momentum.
ROI example: Digital inspections typically save 10 hours weekly in paperwork, worth $500 in labor alone.
Step 4: Train Beyond the Basics
Most training says “check the oil.” Effective training explains why and how:
Training components:
Your training program should include hands-on practice with experienced mentors who can demonstrate proper techniques in real conditions. Teach common failure mode recognition so team members know what developing problems look like. Include cost impact education that explains the financial consequences of missed items.
Ongoing education:
Build ongoing education into your operation through monthly toolbox talks on inspection topics that keep skills fresh. Pursue manufacturer training opportunities that provide equipment-specific expertise. Implement cross-training between operators and mechanics that builds mutual respect and understanding.
Step 5: Measure What Matters
Track metrics that drive improvement:
- Inspection completion rate: Target 98%+
- Average time between failures: Should increase 20% in year one
- PM vs. emergency repair ratio: Aim for 70/30
- Equipment availability: Track uptime percentage
- Cost per operating hour: Monitor maintenance efficiency
Monthly review process:
Establish a monthly review process where you compile metrics in a visual dashboard. Identify problem equipment that needs additional attention. Review inspection quality to ensure procedures are being followed correctly. Adjust procedures based on actual findings rather than assumptions, and recognize top performers who exemplify the inspection culture you’re building.
Step 6: Continuous Improvement Culture
The best inspection program evolves constantly:
- Monthly team meetings: Discuss near-misses and saves
- Quarterly checklist reviews: Add items based on failure patterns
- Annual program assessment: Major revision incorporating lessons learned
- Benchmark against industry: Join peer groups for best practice sharing
Recommended Resource: Equipment Value Calculator: Heavy, Used & New Valuations
Making Heavy Duty Equipment Rental Management & Inspections Easy
Remember that Monday morning excavator crisis? It represents a fundamental challenge in equipment rental: disconnected systems creating blind spots. Your mechanic completed an inspection Friday, but dispatch didn’t know about the developing hydraulic issue. The salesperson booked it for Monday, and now everyone’s scrambling.
This scenario illustrates “rental gridlock”—when fragmented information and manual processes prevent smooth operations. Breaking free requires more than better checklists; it demands unified technology that connects inspections to every aspect of your business.
Transforming Inspections with Unified Technology
Quipli approaches equipment inspections differently. Instead of treating them as isolated tasks, inspections become integrated data points that drive intelligent business decisions. Here’s how modern rental operations can break free from gridlock:
Streamlined Service & Repair Management
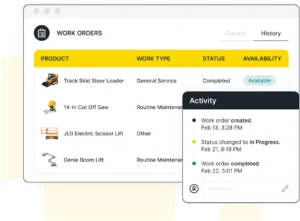
Traditional inspection workflows waste time and create errors. Mechanic finds issue → walks to office → creates work order → manually updates availability → hopes someone tells dispatch. Each handoff risks miscommunication.
Quipli’s Service & Repair features eliminates these friction points:
Instant Work Order Creation
When your mechanic spots that hydraulic leak, they create a work order directly from the inspection screen. The system automatically:
- Links the work order to inspection findings
- Attaches photos from the inspection
- Suggests required parts based on equipment model
- Estimates repair time from historical data
Dynamic Equipment Status Management
Not all issues require immediate downtime. Quipli uses two status levels:
Soft Down: Equipment has issues but remains rentable with restrictions
- Example: “Air conditioning not working—okay for winter rentals”
- System shows limited availability with automatic customer disclosure
- Prevents lost revenue from minor issues
Hard Down: Equipment unsafe or unable to operate
- Immediately removes from availability across all channels
- Notifies sales team of affected reservations
- Triggers priority repair scheduling
Preventive Maintenance That Works
Automated schedule management for your equipment maintenance is a task that’s easily done by Quipli’s platform. Here is how:
Automated Schedule Management
Set it and forget it—almost:
- Configure service intervals by hours or calendar days
- System adjusts for actual usage patterns
- Automatically creates work orders when due
- Considers rental bookings when scheduling
Scenario example: Your CAT 320 excavator needs 500-hour service. Traditional method: hope someone notices the hour meter. Quipli method: operator enters hours at check-in, system automatically schedules service for next available window between rentals.
Keeping Your Equipment in Great Condition with the Right Tools and Partners
Success in equipment rental isn’t about having the newest fleet or lowest prices. It’s about operational excellence—delivering reliable equipment when promised, every time.
Regular inspections form the foundation, but they’re just the beginning. Combine thorough inspection processes with preventive maintenance discipline and unified technology. That’s when your operation transforms from reactive to proactive, from struggling with rental gridlock to operating as a high-velocity rental business.
Your rental company can thrive by viewing equipment care as a competitive advantage. You understand every inspection prevents future failures, extends equipment life, and builds customer loyalty. Most importantly, you can move beyond paper forms and spreadsheets to integrated systems that make excellence achievable.
That transformation is exactly what Quipli helps rental companies achieve daily. We’ve worked with hundreds of operations to break free from rental gridlock through unified technology and proven processes.
A Rental Platform for All Kinds of Equipment
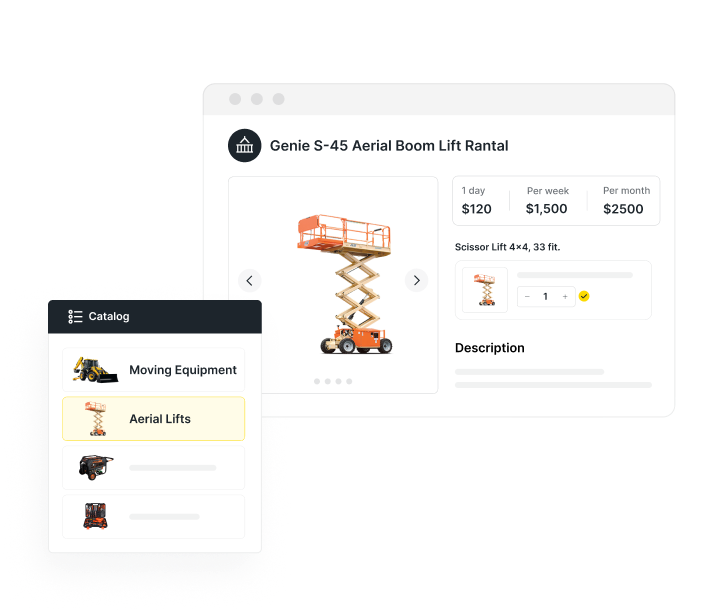
Your equipment mix is unique—perhaps 60% earthmoving, 30% aerial lifts, 10% compaction. Or maybe you specialize in cranes or focus on compact equipment. Regardless of your fleet composition, Quipli provides the unified platform that transforms fragmented operations into efficient, profitable businesses.
Quipli’s equipment rental software eliminates the silos between inventory management, booking and scheduling, customer-facing storefronts, streamlined checkout, and comprehensive reporting.
Ready to see how unified inspection management can transform your operation? Our rental industry experts will show you exactly how we help independent rental companies compete and win against the nationals—starting with equipment inspections that actually work.